Planting material
Sourcing plant material, especially in large quantities, has been one of the main barriers for regional growers wishing to produce kiwiberries at a commercial scale. While there is a small number of nurseries, both within and beyond the region, that offer various kiwiberry selections (see Appendix I ‘Grower Resources’), such vendors are generally geared towards supplying homeowners, with vines costing $15-26 apiece (plus shipping). In addition to these high costs, claimed varietal identities are suspect (see Important Traits and Available Commercial Cultivars). At the moment, only one US nursery (Hartmann’s Plant Company, MI) offers vines at a commercially viable price point ($7/vine retail; $2-4/vine wholesale). To help increase the low-cost, large-scale availability of certified varieties, the NHAES kiwiberry breeding and research program worked with Hartmann’s to confirm variety identification, thereby providing a guaranteed source of confirmed varietal identity. Other nurseries interested in genetically certifying their plant materials are encouraged to contact us. In the meantime, assuming you have access to a desired variety, you may clonally propagate your own materials with little investment or technical training.
Planting from seed
Before discussing clonal propagation, it’s worth noting that growing kiwiberry vines from seed is feasible but not recommended for commercial or home producers. A single, well-pollinated berry can contain up to 250 seeds (Strik 2005); and every seed will produce a unique vine, none of which will be true-to-type. Actinidia arguta is an obligate outcrossing species by virtue of its dioecy; therefore, individual vines are highly genetically heterozygous and seedlings will exhibit unpredictable characteristics resulting from the random genetic combination of the two parental vines. Observations within the NHAES program also indicate that seedling populations are male-biased, composed of slightly more males than females. Because vine sex is unobservable until the plant reaches maturity (at least 3 years), this male bias is a further disadvantage to growers who are limited by time, space, and financial constraints (i.e. all growers). For these reasons, producing vines from seed is a waste of time and resources for producers.
At the NHAES, seedling populations are created and evaluated as part of the long-term breeding program to develop improved varieties for the region. To facilitate this work, we employ molecular screening methods to determine vine sex at the time of germination (Hale et al. 2018). For those interested in pursuing their own breeding efforts, we provide the following seed processing and germination protocol used in our program:
After separating the seeds from the berry, submerge them in over-the-counter hydrogen peroxide (3%) until bubbling has ended, approximately 20 minutes. This treatment facilitates the complete separation of any remaining pulp, which contains germination inhibitors, from the seed. Triple rinse the seeds with clean water and spread them on a paper towel to air dry. Following cleaning, stratify seeds in a refrigerator for 8 weeks to simulate winter chilling (vernalization) and break dormancy. To stratify, place the seeds on a slightly moistened paper towel and hold at temperature within an airtight container, adding water to the towel as needed to maintain damp conditions. Following stratification, seeds may optionally be treated with gibberellic acid (2.5-5 g/L) (Huang 2014) for 24 hours before planting into a high quality, well drained, and well-aerated germination media. To facilitate germination, seeded flats should be subjected to 40-60°F diurnal temperature swings (16 hour days) to simulate warming spring weather. Seed germination should occur in 3-6 weeks. Once emerged, seedlings should be provided with elevated light levels (16 hours per day) and consistent irrigation to speed development. In the NHAES greenhouses, thrips and fungus gnats are the primary pests of concern. If growing outside, be sure to protect the seedlings from slugs, which can devastate a flat overnight.
Clonal propagation
In contrast to propagation from seed, propagation via rooted cuttings is a clonal method of reproduction that successfully captures the traits of the original kiwiberry variety. Straightforward methods for propagating both softwood and hardwood cuttings are provided below.
Softwood propagation
Softwood cuttings are actively growing, vegetative cuttings that ideally should be removed from the chosen parent vine sometime between mid-July and mid-August, as berries are developing. Material selected for propagation should be approximately the diameter of a pencil, with visible lenticels, and be should be transitioning from succulent to lignified woody material (i.e. current season’s growth, just beginning to harden off). To propagate:
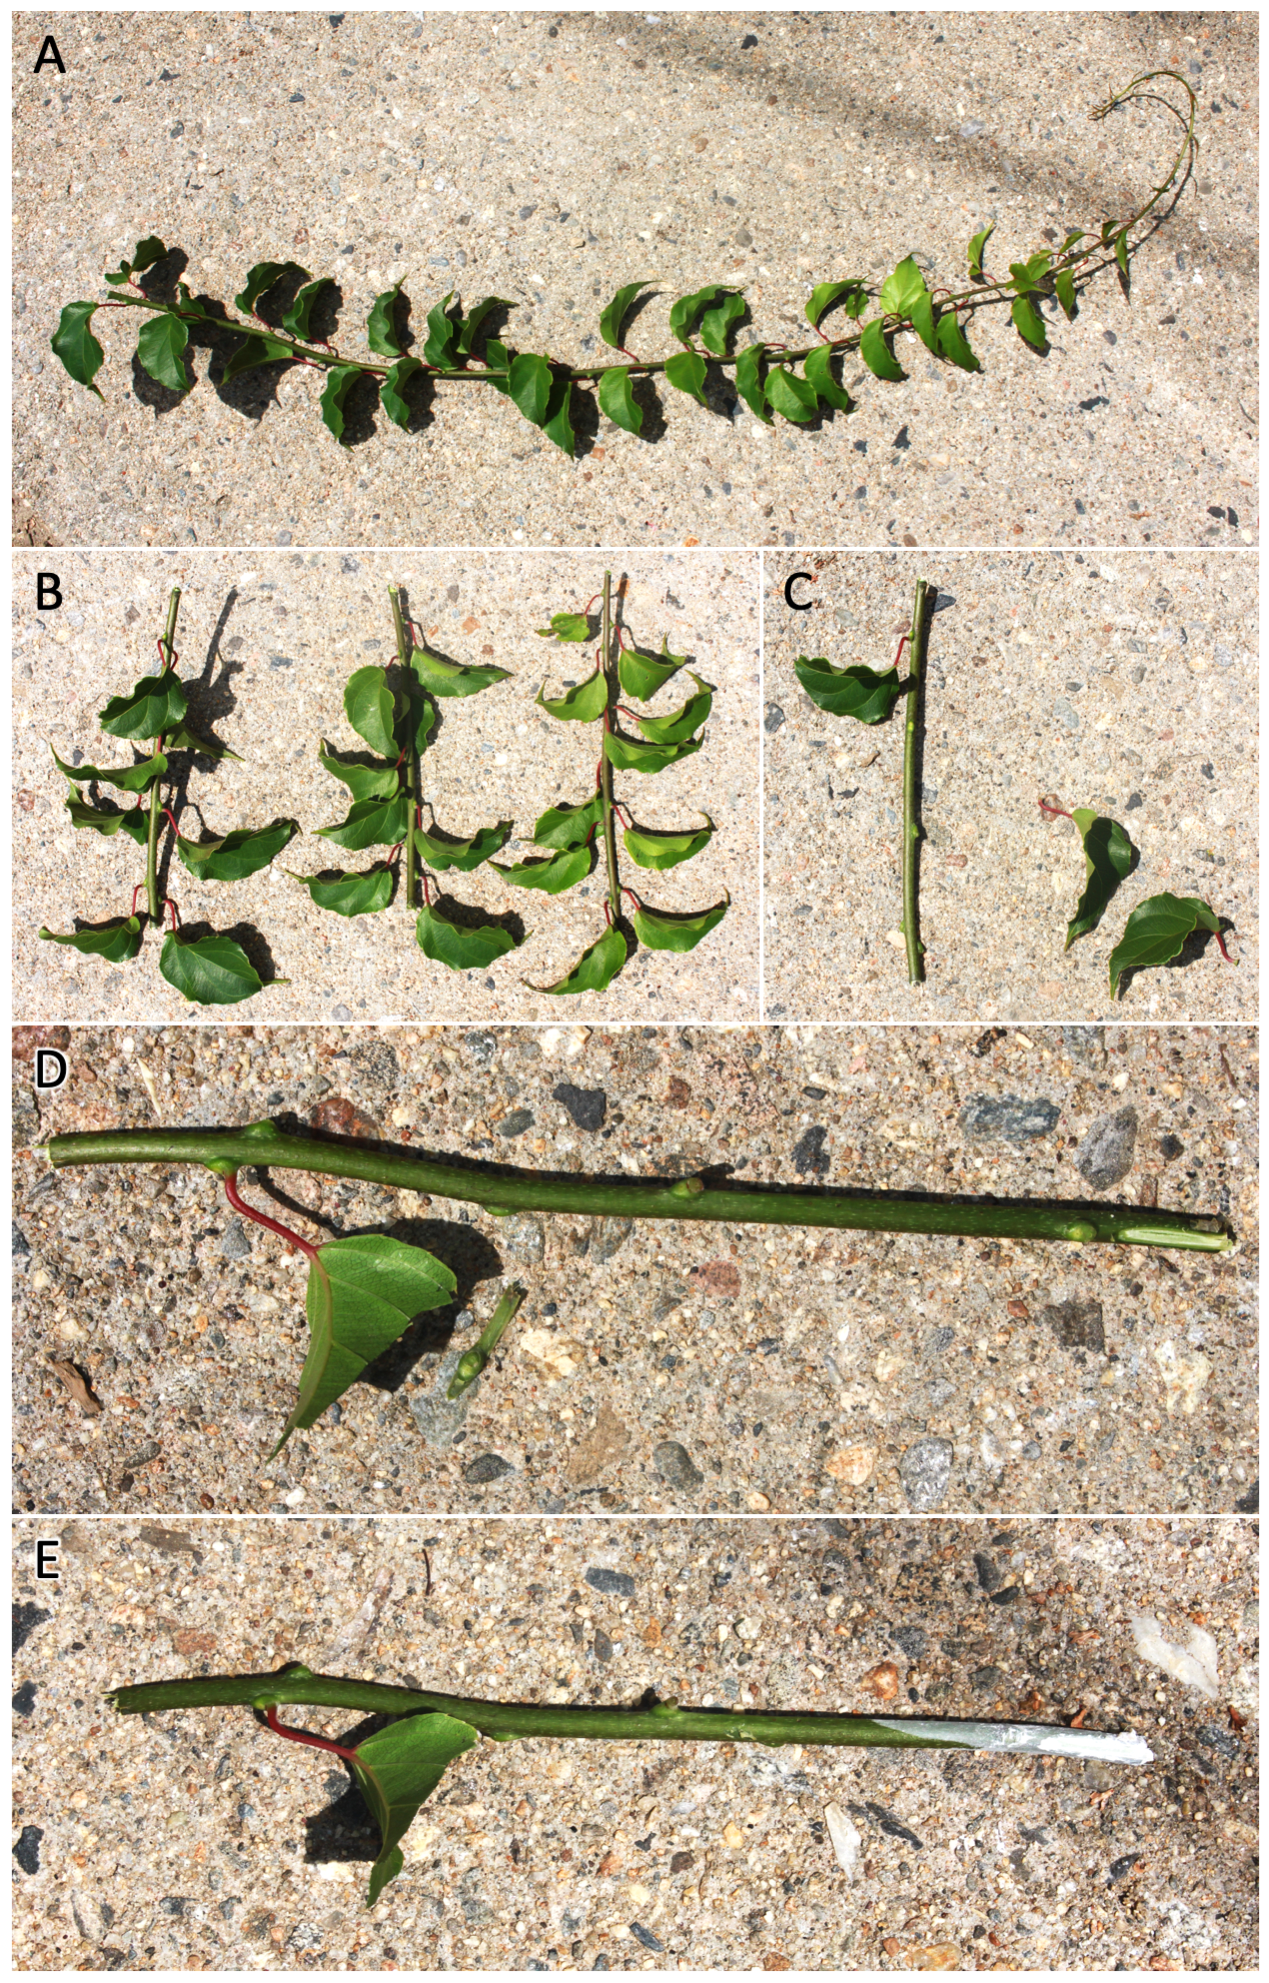
- Select a shoot as described above, measuring approximately 4-6 inches long and containing two or more nodes (Fig 22).
- Make the basal cut immediately below the lowest node and the terminal cut approximately 1/2 inch above the top node; both cuts should be perpendicular to the direction of growth.
- Remove nearly all leaves from the cutting, leaving only one healthy leaf at the top node.
- Trim the edges of the remaining leaf so that its final surface area is approximately 1 in2.
- Using a sharp knife, superficially wound the lowest node via a shallow scrape.
- Dip both ends of the cutting in Hormodin 2 (0.3% IBA) or a similar rooting hormone product.
- Stick the basal end of the prepared cutting into a 50/50 mixture of high porosity media and either perlite or a vermiculite/perlite blend.
- Maintain warm temperatures (70-80°F) and high humidity (85-95% RH) until the cutting has callused, rooted out, and started to produce leaves. Misting cuttings is an excellent way to maintain humidity levels and reduce transpiration.
After sticking the harvested softwood cuttings, the length of time to leaf out can take anywhere from 2-4 weeks. Callus formation will begin in Week 1 and continue until Week 3. Root initiation from the callus may begin as early as the end of Week 1, but significant root formation will not be noted until Weeks 3 or 4. Leaf out, while encouraging, is not a sure sign of successful propagation. Indeed, leaf out may occur anytime from Week 1 onward but successful callusing and root formation are still required for the cutting to survive.
Hardwood propagation
Hardwood cuttings are fully lignified, dormant cuttings that should be removed from the chosen parent vine during winter pruning, prior to sap-flow (typically January-February in our region). To propagate:
- Select a roughly pencil diameter shoot, measuring approximately 10-12 inches long and containing at least 8 nodes.
- Make the basal cut immediately below the lowest node and the terminal cut approximately ½ inch above the top node; both cuts should be perpendicular to the direction of growth.
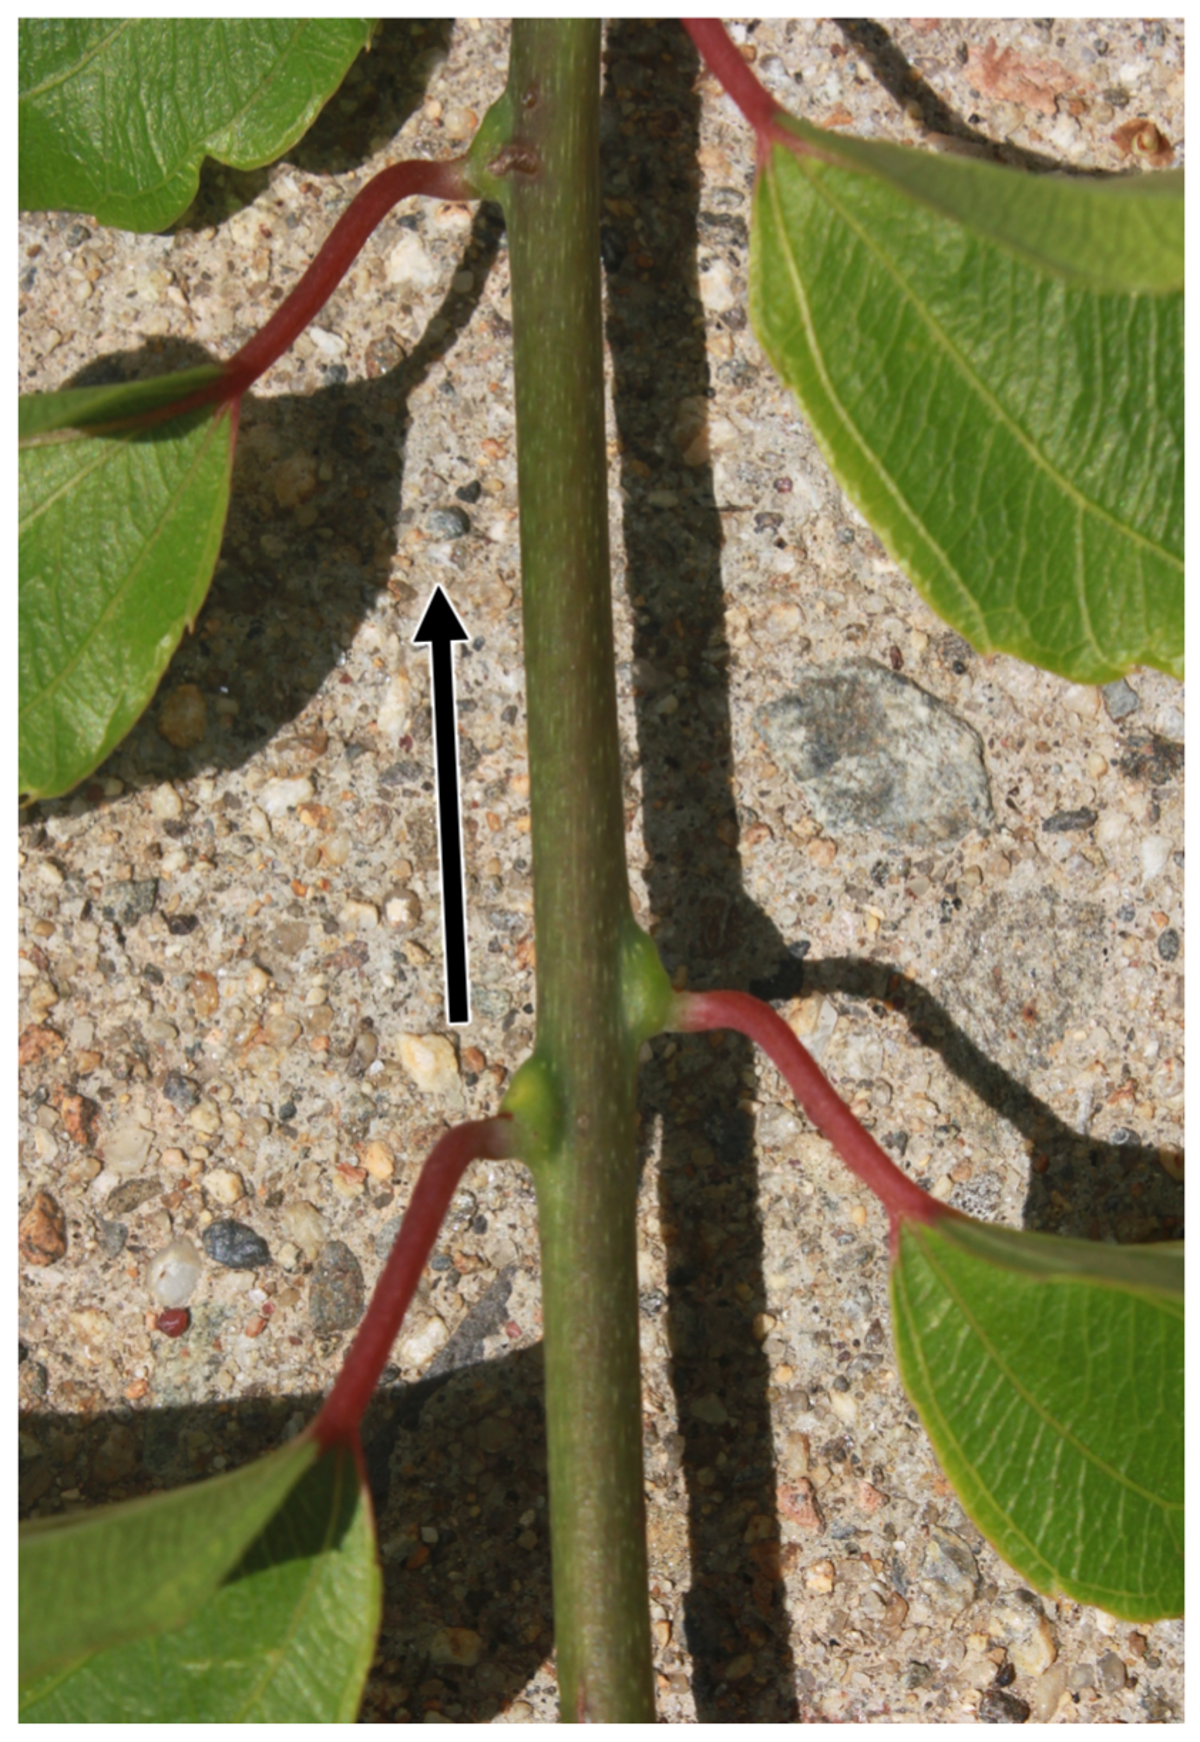
- Using a sharp knife, superficially wound all nodes in the lowest 4 inches of the cutting via shallow scrapes. [NOTE: Once removed from the parental vine, it is easy to confuse the direction of growth of a cutting due to the counterintuitive morphology of kiwiberry nodes (see Fig 23). Take care to maintain the proper orientation of the cutting.]
- Dip both ends of the cutting in Hormodin 2 (0.3% IBA) or a similar rooting hormone product. Ensure that all wounded nodes come into contact with the hormone.
- If propagating indoors in containers, stick the basal end of the prepared cutting approximately 5 inches deep into a 50/50 mixture of high porosity media and either perlite or a vermiculite/perlite blend. Provide warm rootzones (60-70°F) via a seedling germination mat and maintain air temperature as low as possible, but above freezing (35-40°F), to delay budbreak during early root development. Relative humidity should be between 85–95%, and the use of an overhead misting system (or a simple spray bottle) is an effective tool to regulate RH as well as supplement irrigation needs.
- If propagating outside, simply push the prepared cutting into the ground (leave ~4 inches visible) as soon as the ground has thawed. Root development and leaf emergence will typically occur prior to frost-free date; so measures should be taken to protect the growing cutting from late frosts.
If necessary, hardwood cuttings may be stored in a refrigerator for several months before rooting. In fact, such cuttings are ideal materials for grafting, in which case they would be removed from cold storage and grafted to rootstocks typically in April/May. To store hardwood cuttings for rooting or grafting, place them in a sealed bag or container with slightly moistened sphagnum moss, squeezed of all free moisture.
Transplanting
Propagation requires time and resources, so care should be taken to ensure the success of rooted plants once they are transplanted to the field. Softwood cuttings will leaf out by late summer/early fall and should be transplanted into containers to allow for continued root development. These plants should be protected from freezing temperatures, either in a greenhouse or some other protective structure, for the duration of the winter and can be transplanted to the field the following spring, once the danger of frost has passed. During the winter, once the newly rooted cuttings have been dormant for at least 4 weeks, supplemental heat and lighting (16 hour days) can be applied to force the plants, thus initiating the season’s growth. This early forcing allows plants to develop a more sizeable root ball before transplanting, not to mention more available growth from which a trunk may be selected. Supplemental heat and lighting will similarly help rooted hardwood cuttings get a jump start on the season and has been observed to accelerate their transition to maturity by as much as a season (D. Jackson, pers. communication). If space allows, delaying transplanting until the second year may be beneficial as young vines (one-year-old) have been observed to develop relatively poorly, resulting in a year delay in fruiting, compared to stronger two-year-old transplants (P. Latocha, pers. communication). But whether softwood or hardwood, forced or not, held for one winter or two, all propagated plant stock destined for transplanting to the field should be protected from temperature extremes and frequently monitored for irrigation needs.
Once the danger of frost has passed, cuttings with a well-developed root ball (the NHAES program aims for a minimum of a 4 inch diameter root ball) may be transplanted into the vineyard. Prepare the planting site by loosening soil at least one foot in all directions to facilitate subsequent root and water penetration. Take care to maintain the in-ground depth of the vine to that of its original container because burying the stem below the soil can increase the risk of rot to the plant. One of the most critical factors for newly transplanted vines is the availability of sufficient water. If conditions are unfavorable, new transplants can sunburn and desiccate within a matter of hours, setting them back an entire season, if they survive at all. Shade cloth may be applied to reduce the total hours of direct sun received by new transplants until they are fully acclimated. Alternatively, while still in their containers, young vines may be held for a short time in an intermediate environment (e.g. lath house) to ease their transition to the field.
Fig 22 Step-by-step processing of softwood cuttings for propagation. First, select an arm’s length shoot from which to take multiple cuttings (A). From that shoot, select several 4-6 inch long semi-lignified sections which are roughly pencil diameter and have multiple nodes, while noting their direction of growth (B). For each section, remove all but the topmost leaf (C),;shallowly wound both sides of the base and reduce the surface area of the remaining leaf (D), and treat both ends with growth hormone before sticking (E).
Fig 23 Care must be taken when propagating kiwiberry due to the counterintuitive morphology of the nodes, particularly when propagating dormant, hardwood cuttings (no leaves). The arrow indicates the direction of growth towards the distal end of the shoot.


